Don't miss our holiday offer - up to 50% OFF!
How to Allow Snapchat Access to Your Camera: A Comprehensive Guide
Snapchat is one of the most popular social media platforms in the world, known for its unique features that let users share photos, videos, and stories that disappear after being viewed. One of the key features of Snapchat is its ability to use your device’s camera to take and send Snaps. However, in order to use Snapchat effectively, the app needs permission to access your camera. If you’ve encountered issues or need a step-by-step guide on how to allow Snapchat access to your camera, this article is for you.
In this guide, we’ll walk you through how to grant Snapchat camera access on various devices, troubleshoot common issues, and explore why Snapchat needs this permission. Whether you’re using an iPhone or an Android device, you’ll find clear instructions to help you get the most out of the app.
Why Snapchat Needs Access to Your Camera
Before we dive into the technical steps, it’s important to understand why Snapchat requires access to your camera. The camera is essential for several features within the app, including:
- Taking Snaps: Snapchat is primarily about capturing photos and videos. Without camera access, you wouldn’t be able to use this core feature.
- Filters and Lenses: Snapchat’s AR filters and lenses require real-time camera input to superimpose graphics, effects, and animations onto your image.
- Video Chat: Snapchat’s video chat functionality relies on your device’s camera to facilitate real-time communication with friends.
- Snap Map and Location Sharing: Some features, like adding location stickers or sharing your Snap on the Snap Map, also require camera access to capture images or videos associated with your location.
Now that you know why Snapchat needs your camera, let’s explore how to enable the required permissions on different devices.
Also, Read Best Instagram Editing Apps to Elevate Your Content Game
How to Allow Snapchat Access to Your Camera on iPhone
If you’re using an iPhone and Snapchat isn’t able to access your camera, you’ll need to grant permission through your device’s settings. Here’s how to do that:
Step 1: Open the Settings App
To begin, open the Settings app on your iPhone. This is where you can manage all of your app permissions.
Step 2: Scroll to Privacy
Once you’re in Settings, scroll down and tap Privacy. This is where you can manage permissions for all the apps installed on your iPhone, including Snapchat.
Step 3: Select Camera
Under the Privacy section, you’ll find a list of permissions for different services. Tap Camera. This will show you a list of apps that have requested access to your camera.
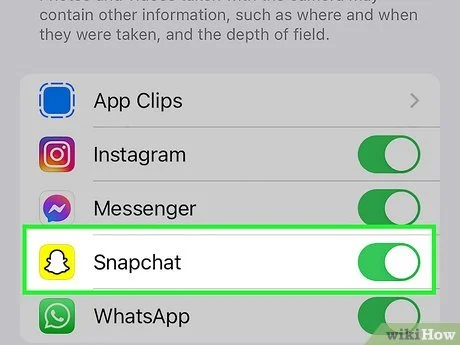
Step 4: Toggle Snapchat Access On
In the list of apps, locate Snapchat. If the toggle next to Snapchat is off (grayed out), it means the app doesn’t have permission to access your camera. Simply toggle the switch to the on position (green) to allow access.
Step 5: Test Snapchat Camera
After granting Snapchat permission, open the Snapchat app to test the camera. Try taking a photo or video to make sure everything is working as expected.
If Snapchat still can’t access the camera, you may need to troubleshoot further by restarting your iPhone or checking for any system updates.
How to Allow Snapchat Access to Your Camera on Android
On Android devices, granting Snapchat access to your camera is also done through the device’s settings. Follow these steps to enable the camera permission on your Android device:
Step 1: Open Settings
First, open the Settings app on your Android phone.
Step 2: Go to Apps or Apps & Notifications
Scroll down and find the Apps or Apps & Notifications option (this may vary slightly depending on your Android model). Tap on it to see a list of all the apps installed on your device.
Step 3: Select Snapchat
Find and tap on Snapchat from the list of apps. If you don’t see it right away, you can search for it using the search bar at the top of the screen.
Step 4: Tap Permissions
Once you’ve selected Snapchat, tap on the Permissions option. Here, you’ll see a list of permissions that Snapchat has requested, including access to your camera, microphone, and location.
Step 5: Enable Camera Access
In the permissions menu, look for the Camera option. If the toggle is off, switch it to on to grant Snapchat access to your camera.
Step 6: Test the Camera
Open Snapchat to test whether the camera is working correctly. Try taking a Snap or using one of Snapchat’s filters to ensure that the camera is functioning as it should.
Also, Read How to Change Your Gender in Snapchat
Troubleshooting Common Issues
If you’ve followed the steps above but Snapchat is still not accessing your camera, there could be several reasons why. Here are a few troubleshooting tips:
1. Check for App Updates
Sometimes, app bugs can prevent Snapchat from working correctly. Make sure you’re using the latest version of Snapchat by checking the App Store (iOS) or Google Play Store (Android) for updates.
2. Restart Your Device
If the app still isn’t working after updating it, try restarting your device. This can often resolve minor software glitches and refresh the app’s permissions.
3. Check for System Updates
Your phone’s operating system may also need an update. Go to your device’s Settings, tap Software Update (or System Update), and check if there’s a new update available. Install any updates to make sure both your phone and Snapchat are running the latest software.
4. Reinstall Snapchat
If none of the above solutions work, try uninstalling and reinstalling Snapchat. Sometimes, a fresh installation can resolve app-specific issues. To do this:
- iPhone: Hold the Snapchat app icon and select Delete App. Then go to the App Store to reinstall it.
- Android: Tap and hold the Snapchat icon, select Uninstall, and then reinstall it from the Google Play Store.
5. Check for Conflicting Apps
Some apps that manage permissions, such as screen recorders or third-party camera apps, may interfere with Snapchat’s access to your camera. Check if you have any such apps installed and try disabling them temporarily.
Additional Tips for Using Snapchat’s Camera
Once Snapchat has access to your camera, here are a few tips to enhance your Snapchat experience:
1. Use Snapchat Lenses and Filters
Snapchat is known for its creative lenses and filters. These augmented reality (AR) features allow you to transform your appearance, add fun effects, and make your Snaps more engaging. To access these features, tap the smiley face icon next to the camera button and browse through the available lenses.
2. Adjust Camera Settings for Better Quality
You can adjust the camera settings on Snapchat to improve the quality of your photos and videos. To do this:
- Open Snapchat and swipe down on the camera screen.
- Tap the gear icon to access settings.
- Look for the Camera settings section to enable features like Grid, Auto-Flash, and Video Quality.
3. Enable Flash for Low Light Conditions
If you’re taking photos or videos in low-light conditions, consider enabling the flash. You can toggle the flash by tapping the lightning bolt icon next to the camera button before taking a Snap.
4. Experiment with Filters in Real-Time
Snapchat’s real-time filters use your camera to create effects that can interact with your environment. Try using filters while you’re moving or experimenting with different backgrounds to create unique Snaps.
Also, Read How to Redownload TikTok After a Ban?
Conclusion
Granting Snapchat access to your camera is a simple process that can be done in just a few steps on both iPhone and Android devices. By ensuring that the app has the necessary permissions, you can take full advantage of Snapchat’s many features, from taking Snaps to using filters and lenses. If you encounter issues along the way, don’t forget to check for app updates, restart your device, and troubleshoot any potential software conflicts.
Whether you’re a regular user or just getting started, ensuring that Snapchat can access your camera is the first step to creating memorable content and engaging with your friends on the platform.